
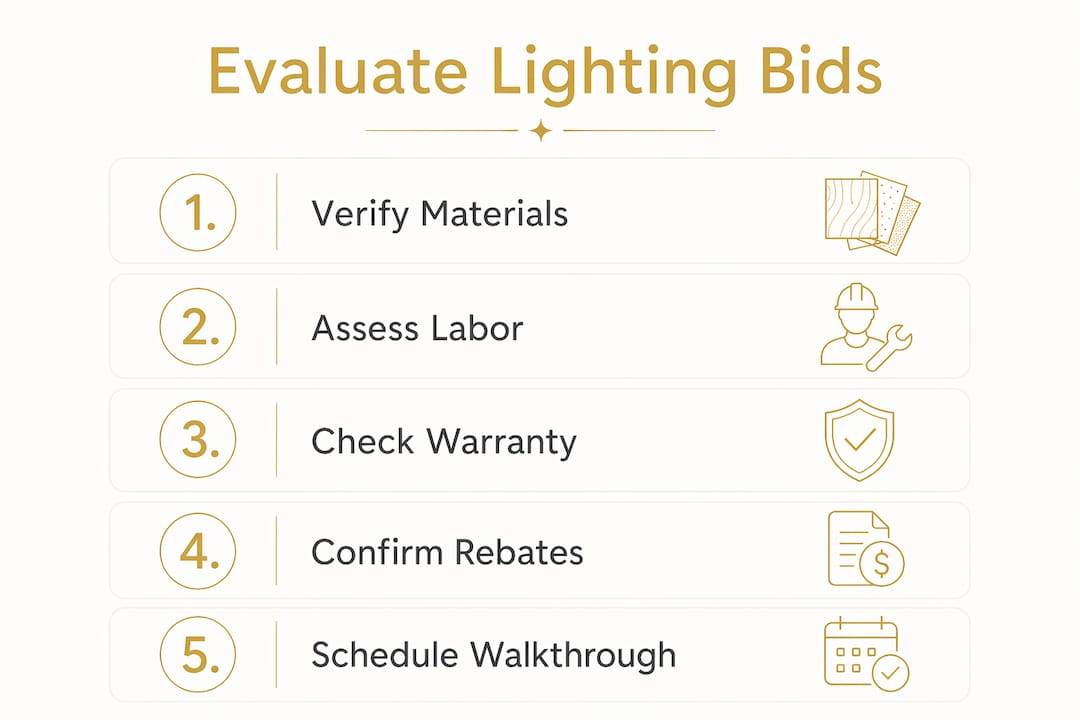
Evaluating outdoor lighting installation proposals means systematically comparing technical scope, warranty coverage, fixture quality, and installation workflows before signing any contract. The difference between a well-lit estate and a costly disappointment often comes down to what is and is not written in the bid. Homeowners and estate managers who review landscape lighting proposals at the line-item level, rather than the bottom-line price, protect themselves from change orders, inferior fixtures, and contractors who cut corners after the deposit clears.
What to look for when you evaluate outdoor lighting installation proposals
A strong proposal does more than list fixture counts and a total price. It demonstrates that the contractor understands your property, your goals, and the technical requirements of a quality installation.
The industry standard for validating lighting performance is the submission of third-party test documentation. LM-79, LM-80, and IES/LDT files are required in 2026 tender-ready checklists to prove fixture output, color accuracy, and lumen depreciation over time. A contractor who cannot supply these documents is asking you to take their word for the quality of their fixtures.
Beyond documentation, look for these elements in every proposal you receive:
- Photometric study or lighting design report: This shows how light will actually fall across your property, including coverage gaps and potential glare zones.
- Fixture datasheets: Unbranded, third-party verified specs for every luminaire proposed.
- Warranty terms: Understand whether coverage is parts-only or parts-and-labor, and for how long. A 10-year parts-only warranty differs greatly from a 5-year parts-and-labor warranty in real homeowner value.
- Infrastructure tasks: Pole inspections, conduit work, and fixture disposal should be explicitly listed, not assumed.
- Labor assumptions: Any proposal that does not address special equipment access, traffic control, or site restrictions is hiding future costs.
- Energy efficiency and rebate eligibility: High-quality LED fixtures carry ratings between 50,000 and 100,000 hours, and many qualify for utility rebates that reduce your net cost.
Pro Tip: Ask every contractor to confirm whether their proposed fixtures are rebate-eligible through your local utility. This single question separates contractors who know their products from those who are reselling whatever is available.
How do you compare scope and pricing without getting burned?
The most common mistake homeowners make when comparing lighting installation quotes is treating the total price as the unit of comparison. Bids for the same project can vary 30–40% based on what each contractor includes or quietly omits. That variance is not a reflection of contractor greed or generosity. It reflects entirely different assumptions about scope.
To compare bids fairly, follow this process:
- Request line-item breakdowns. Every proposal should separate materials, labor, equipment rental, and closeout documentation into distinct cost categories. A single lump-sum number tells you nothing useful.
- Identify what is missing. Low bids often exclude photometric design, rebate-eligible fixtures, and critical installation tasks. List every omission and ask the contractor to price it separately.
- Evaluate total cost of ownership. Lower upfront bids can lead to higher maintenance costs when proprietary fixtures or inferior components lack replacement support years later.
- Check contract language for phased work and access terms. Contracts should explicitly state installation conditions such as after-hours access, tenant notifications, and phased work schedules to prevent delays and extra charges.
- Confirm cleanup and closeout are included. Disposal of old fixtures, site restoration, and final documentation are frequently omitted from low bids and added as change orders at the end.
| Bid Component | What to Verify |
|---|---|
| Materials | Fixture brand, model, and third-party certification |
| Labor | Hours estimated, crew size, and special equipment |
| Equipment | Lift rental, traffic control, or access restrictions |
| Warranty | Parts-only vs. parts-and-labor, duration, and transferability |
| Closeout | As-built drawings, control settings, and warranty records |
Pro Tip: Build a simple spreadsheet with every line item from each bid. Add a column for items one contractor includes that another omits. Price those omissions at market rate and add them to the lower bid. The true cost gap is almost always smaller than it appears.
What should you expect on installation day?
Knowing what a professional installation looks like helps you oversee an outdoor lighting installation crew with confidence. A well-run project follows a predictable sequence, and any deviation from it is worth questioning.
A standard residential installation day runs in four phases. The crew begins with a 15–30 minute pre-install site review where measurements are confirmed and any last-minute site conditions are addressed with you directly. The main installation phase follows, covering fixture mounting, wiring, and conduit work. After installation, the crew conducts system testing and a 15–20 minute app or controller walkthrough so you understand how to operate your new system. The day closes with a perimeter cleanup. For a standard bungalow, the full process takes 4–6 hours and costs between $4,500 and $5,500 including track, LEDs, app setup, labor, and warranty.
Here is what to watch for as you oversee the crew:
- Pre-install confirmation: The crew lead should walk the property with you before any work begins. If they skip this step, ask for it.
- Nighttime commissioning: Proper commissioning includes nighttime aiming and testing. Daytime turnover is not sufficient to verify glare control or confirm that fixtures are aimed correctly.
- Glare and spill control: Watch that fixtures are aimed at architectural features or landscape elements, not at neighboring properties or the street.
- Site-specific variables: Site visits identify soil conditions, electrical infrastructure, and mounting surfaces that affect final costs. If a contractor skipped a site visit during the bid phase, expect surprises during installation.
Pro Tip: Schedule a brief walkthrough at dusk on installation day before the crew leaves. This is your only chance to request aiming adjustments while the team is still on site and the cost is zero.
You can also review the difference between string lights and professional systems to better understand what a professional installation should deliver compared to consumer-grade alternatives.
How do you assess contractor professionalism in a proposal?
The quality of a contractor's documentation is a direct signal of their professionalism. Comprehensive closeout packages with as-built drawings, fixture schedules, and control settings are the clearest indicator that a contractor will be easy to work with long after installation day.
A professional proposal should include:
- As-built drawings: A map of every fixture location, circuit, and control zone as actually installed.
- Fixture schedules: A complete list of every luminaire with model numbers, wattage, color temperature, and warranty terms.
- Control settings documentation: Written records of photocell sensitivity, motion sensor zones, and timer schedules.
- Warranty registration records: Proof that fixtures are registered with the manufacturer in your name.
Qualified bids specify installation methods, control sequences, and glare control measures. Vague descriptions like "install fixtures per plan" with no further detail are a red flag. They indicate a contractor who either does not know the specifics of their own process or does not want to be held to them.
"Missing closeout documentation makes systems harder and costlier to maintain long term. The best contractors treat documentation as part of the deliverable, not an afterthought."
Warranty scope matters more than warranty length alone. A contractor offering a 10-year parts-only warranty sounds impressive until you realize that labor to replace a failed fixture is your expense. A 5-year parts-and-labor warranty from a reputable firm often delivers more real protection. When you assess outdoor lighting bids, always ask: "If a fixture fails in year three, what does it cost me out of pocket?"
Key takeaways
Evaluating outdoor lighting installation proposals requires comparing line-item scope, warranty labor coverage, and closeout documentation, not just the bottom-line price.
| Point | Details |
|---|---|
| Compare scope, not price | Bids vary 30–40% based on included tasks; always compare line-item breakdowns. |
| Demand third-party documentation | LM-79, LM-80, and IES files prove fixture quality before you commit. |
| Prioritize parts-and-labor warranties | Labor-inclusive warranties protect you from out-of-pocket repair costs after installation. |
| Require nighttime commissioning | Daytime turnover is insufficient; aiming and glare control must be verified after dark. |
| Closeout docs signal contractor quality | As-built drawings and fixture schedules make future maintenance faster and less expensive. |
What i've learned after reviewing hundreds of lighting proposals
After years of working with estate managers and homeowners across Los Angeles, I have seen the same pattern repeat itself. The homeowner who chose the lowest bid calls back six months later. The fixtures are fading. There are no as-built drawings. The contractor is unresponsive. The warranty covers parts, but the labor to swap a single fixture costs more than the fixture itself.
The proposals that hold up over time share three qualities. They are specific about materials, honest about labor assumptions, and thorough in their closeout commitments. A contractor who hands you a two-page proposal for a full estate lighting installation is not being efficient. They are being vague on purpose.
My strongest advice: do not let aesthetics drive the decision before the technical review is complete. A beautiful rendering means nothing if the fixtures are not certified, the warranty excludes labor, and the contractor has never done a nighttime commissioning walkthrough. Get the technical details right first. The beauty follows from the quality of the execution.
Engage proactively during the bid phase. Ask for site visits. Ask for photometric studies. Ask what happens if a fixture fails in year four. The contractors who answer those questions clearly and without hesitation are the ones worth hiring.
— Chris
Ready to work with a team that gets it right the first time?

Elegantoutdoorlights designs and installs bespoke landscape lighting systems for private estates across Bel Air, Beverly Hills, Pacific Palisades, and Malibu. Every project includes a custom design consultation, third-party certified fixtures, nighttime commissioning, and a full closeout package with as-built drawings and warranty records. Whether you are planning a year-round architectural installation or a spectacular holiday lighting display, Elegantoutdoorlights delivers the white-glove experience your property deserves. Contact us to schedule your personalized consultation and receive a proposal that answers every question before you ask it.
FAQ
What makes a lighting proposal technically complete?
A complete proposal includes photometric studies, LM-79 and LM-80 certified fixture datasheets, line-item cost breakdowns, warranty terms specifying parts-and-labor coverage, and a closeout documentation plan covering as-built drawings and control settings.
Why do outdoor lighting bids vary so much in price?
Bids for the same project can vary 30–40% because contractors make different assumptions about scope, and low bids frequently omit photometric design, rebate-eligible fixtures, and infrastructure tasks that appear as change orders later.
How long does a residential outdoor lighting installation take?
A standard residential installation for a bungalow-sized home takes 4–6 hours and typically includes a pre-install site review, main installation, system testing, controller walkthrough, and site cleanup, all completed in a single day.
What is nighttime commissioning and why does it matter?
Nighttime commissioning is the process of aiming and testing fixtures after dark to verify coverage, glare control, and correct fixture orientation. Daytime turnover alone cannot confirm that the system performs as designed.
What red flags should i watch for in a lighting proposal?
Vague descriptions with no installation method detail, missing warranty labor coverage, no mention of closeout documentation, and the absence of a site visit during the bid phase are the clearest signs that a contractor will create problems after the contract is signed.